

How To Clean A Arcade Crt Monitor
Arcade grime. It'south a constant in the hobby. Dealing with 35-year-old equipment comes with many downsides. Aside from questionable reliability, your newly caused archetype arcade cabinet is probable to arrive with the filthy airborne residue from the environment they've been located in – smoky arcades, bars, barns, garages and warehouses. It is inevitable that over fourth dimension a layer of muck is going to build up both inside and out of whatever arcade game.

You lot can read some of my arcade restoration posts to come across the state that many machines end up in. At some point yous have to brand a decision on how to clean these things up. I should betoken out that there are collectors who don't clean their PCBs. The mantra of "if it ain't broke, don't fix it" is a valid ane, only to those of united states of america of a more than OCD nature, it is something that has to be addressed.
At present the sensible route would exist to use products that are designed for that purpose – a vacuum cleaner with brush heads, alcohol, dry out sponges, Q-Tips and magic erasers are all valid ways to clean upwards a PCB covered in dust and grime. Personally, I don't have the patience to sit down for hours to make clean up intricate parts using a Q-Tip and alcohol, and when I have gone down that route, I've never concluded up with results that I'chiliad completely happy with.
But there is a quicker fashion: lather and h2o!

Thank you to collector James Brooks for the two pictures in a higher place by the style. That's the aforementioned arcade PCB later a good wash. The difference is like night and day.
At present I appreciate to some people this is an incredulous suggestion. Getting a PCB and electric parts wet? How on earth does that make whatsoever sense? And there are plenty of perfectly valid reasons why this method should exist avoided – on paper at least. Lather, according to Wikipedia is a "common salt of fatty acid". Logic tells us that common salt is corrosive and PCBs contain many metal parts. Whatsoever residual left on the board could pb to future issues.
In that location's no dubiousness that the community is divided on this issue. All I can say is I've done this many times and accept gained excellent results without any resultant problems.
And then this calendar week, I thought I'd document a recent make clean upwards I undertook of a piffling 14″ Kortek arcade monitor that I picked up a few weeks back. It was pulled out of a greenhouse, having been stored there for four years. Amazingly it worked, but information technology was filthy. And then let's go started:
Hither's our monitor. As you tin can come across, it'south pitted with oxidation and rust on the frame. First chore is to discharge information technology with a HV probe to brand information technology safe to work on:

Then dismantle everything:

That PCB is not pretty at all:

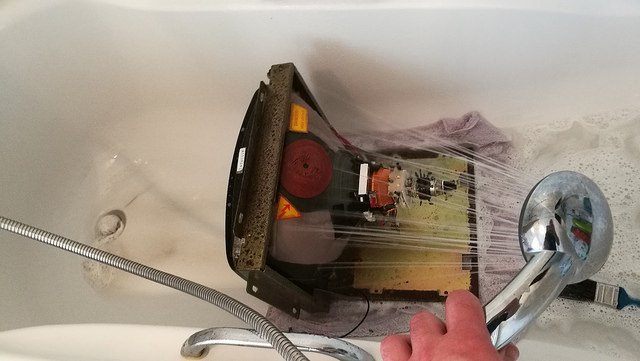
So let'south go to the bathroom and commandeer the bath tub (quickly, before the lady of the house notices):

Outset job is spray everything with a solution of warm water and washing up liquid, then agitate everything with a soft paint brush. Make sure you lot piece of work the suds into every nook and cranny of the board:


Leave for xv minutes, and so rinse thoroughly with the shower head:

How'south this for clean?

Quite a divergence. At present the central bit – we need to get everything bone dry as rapidly as possible. In that location's various ways to do this – if y'all are fortunate to live in the state of Nevada, you tin can get out your PCB out in the sun all twenty-four hour period. I've heard of other guys pointing a fan to accident warm air at it for an afternoon, and others even put their parts in the oven at a depression temperature for fifteen minutes or so! What I do is give everything a good going over with a hair dryer for five or ten minutes:

This blows abroad whatsoever residual h2o. I then leave the board in the linen cupboard to completely dry overnight. While that was going on, I gave the tube the aforementioned treatment:
Then out to the garage to await at these rusty frames. For this, I use a wire brush attachment to the drill and work away at the surface rust:


Screw heads also (why not?). A day afterward, assemble the parts back upwards:

Looking skilful!


Double check all wiring, hook upward to Centipede cabinet and here nosotros go:

After a few adjustments, we get a brilliant clear picture. I left it soak testing (pardon the pun) for a few hours and everything was fine. Here's a earlier/after:


Everything is shiny make clean, and the rust on the frame surroundings is no more than!
So in that location y'all become. Information technology is a very unorthodox process to go through, and I'll admit that I concord my breath when firing things support once again, simply I've done this a few times and always end up with adept results and accept never had any problems.
The guys over at Canadian Arcade posted a video last year of how they 'wash' an arcade monitor. Slightly unlike method, simply with the same result. It'south worth a scout if you have a few minutes spare:
Thanks for stopping by this week. Do subscribe and share using the buttons beneath if you feel inclined.
Tony

Source: https://arcadeblogger.com/2017/05/12/lets-wash-an-arcade-monitor/
Posted by: wrightdeshe1946.blogspot.com
0 Response to "How To Clean A Arcade Crt Monitor"
Post a Comment